
IBM Cloud Pak for Applicationsの新規販売は終了いたしました。
今後のアプリケーションランタイムソリューションは、2021年1月15日に発表されたWebSphere Hybrid Editionとなります。
1.本記事について
本記事は「IBM Cloud Pak for Applicationsを導入してみた(OpenShift導入編)」の コマンドの詳細を掲載したものです。
本編をご覧頂きながら、詳しいコマンドや実行結果を本記事でご確認ください。
2. 事前準備
2-1. 作業用Linux環境準備
(1)Cent OSインストールとディレクトリ作成
今回はCent OS 7をインストールし、ルート配下に以下の3つのディレクトリを作成します。
- /work ※作業用スペース
- /os42 ※OpenShift インストールプログラム置き場
- /os42/conf ※yamlやjsonなどの設定ファイル置き場
(2)AWS CLIインストール
前提ソフトウェアを確認し、AWS CLI をインストール・設定します。
<前提バージョン(2.7または3.4以上)の python が導入されていることを確認します。>
# python –version
Python 3.6.8
<aws cliをインストールし、バージョンを確認します。>
rootユーザーで実行する場合の手順を行いました。
# curl “https://s3.amazonaws.com/aws-cli/awscli-bundle.zip” -o “awscli-bundle.zip”
# unzip awscli-bundle.zip
# export PATH=~/.local/bin:$PATH
# source ~/.bash_profile
# pip3 install awscli –upgrade –users
# aws –version
aws-cli/1.18.31 Python/3.6.8 Linux/4.18.0-147.5.1.el8_1.x86_64 botocore/1.15.31
<aws cli設定>
AWSアカウント情報・利用するリージョンを元にAWS CLIを設定します。
# aws configure
AWS Access Key ID: ※利用するAWSアカウントのAccess Keyを入力
AWS Secret Access Key: ※利用するAWSアカウントのSecret Access Keyを入力
Default region name [None]: ap-northeast-1
Default output format [None]: json
(3)jqパッケージのインストール
<CentOS 7 の標準リポジトリには jq が含まれていないので、EPELリポジトリを yum コマンドでインストールし、その後 jqパッケージをインストールします。>
# yum -y install epel-release
# yum -y install jq
2-2. インターネットドメインの取得とRoute53への登録
<インターネット上から OpenShift クラスターにアクセスするためにインターネットドメインを利用できるようにします。>
今回は AWS Route53で独自ドメインを取得・登録しました。
インターネットドメイン名:example.com(仮称)
2-3. インストールファイルの取得
インストールに利用するファイルを用意します。
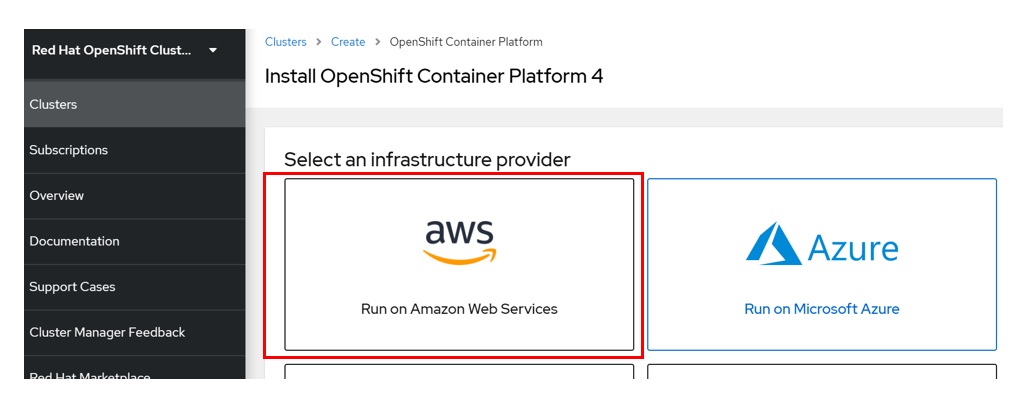
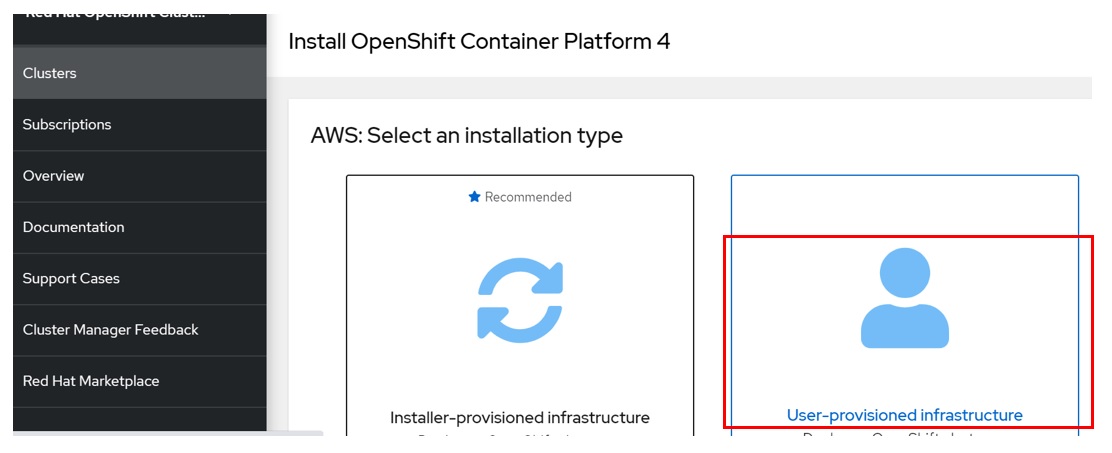
<作業用Linuxマシンにて、Red Hat OpenShift Cluster Manager サイトの「Infrastructure Provider」ページから「AWS」-「User-Provisioned Infrastructure」を選択し、(1)OpenShift installer と(2)Pull secret をダウンロードし “oc42ディレクトリ” に配置します。>
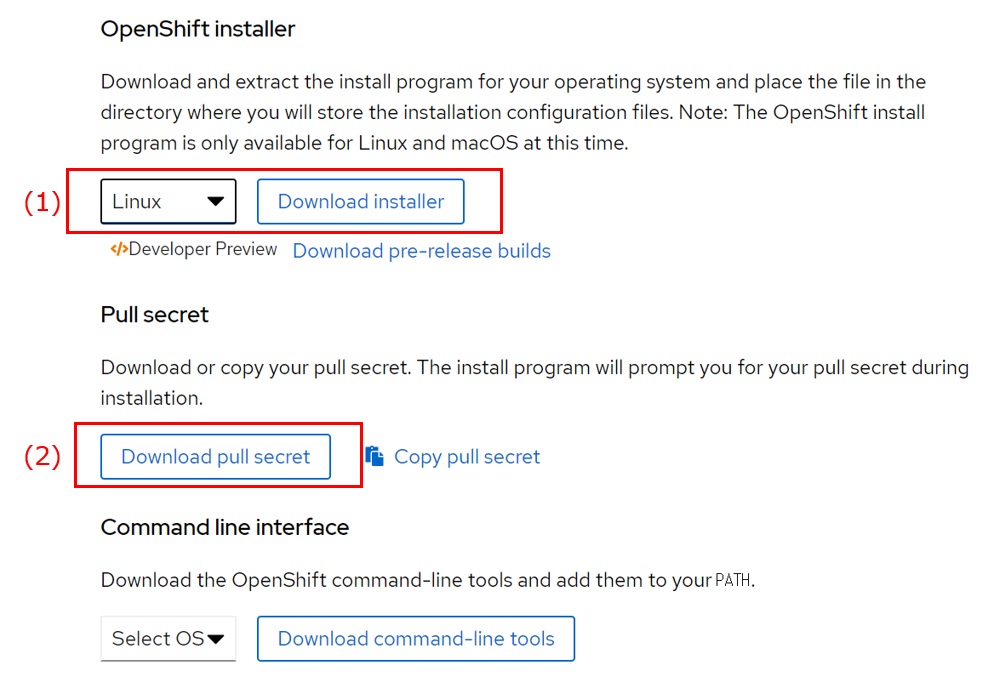
以下、配置後の確認結果です。
# ll
drwxr-xr-x. 2 root root 4096 3月 18 09:39 conf
-rw-r–r–. 1 root root 80468756 3月 16 10:18 openshift-install-linux-4.2.23.tar.gz
-rw-r–r–. 1 root root 2763 3月 4 13:15 pull-secret.txt
3. OpenShift 導入手順
3-1.AWS 環境構築
(1)SSH プライベートキーの生成およびエージェントへの追加
<作業用 Linuxマシン上で以下コマンドを実行し SSHキーを作成します。>
# ssh-keygen -t rsa -b 4096 -N ” -f ~/.ssh/id_rsa
Generating public/private rsa key pair.
Created directory ‘/root/.ssh’.
Your identification has been saved in /root/.ssh/id_rsa.
Your public key has been saved in /root/.ssh/id_rsa.pub.
The key fingerprint is:
SHA256:jyTeAdzo1xi7bZh7+EK+r6j7y5rVDT5Jus8U9JDX8vs root@rpa-20
The key’s randomart image is:
+—[RSA 4096]—-+
| |
| . o . . |
| + * o . |
| . o O o |
| o S o . |
| . X.& . |
| +o%.= . |
| + =++. . |
| ==*o*Bo E |
+—-[SHA256]—–+
<ssh-agent プロセスをバックグラウンドタスクとして開始します。>
# eval “$(ssh-agent -s)”
Agent pid 13552
<SSH プライベートキー(id_rsaファイル)を ssh-agent に追加します。>
# ssh-add ~/.ssh/id_rsa
Identity added: /root/.ssh/id_rsa (/root/.ssh/id_rsa)
(2)AWS のインストール設定ファイルの作成
<install-config.yaml ファイルを取得します。>
以下を実行すると install-config.yaml ファイルが作成されます。
# ./openshift-install create install-config –dir=/os42
プロンプト上で選択または入力
- SSHキー:/root/.ssh/id_rsa ※”(1)SSH プライベートキーの生成およびエージェントへの追加”で作成したSSHキー
- ターゲットプラットフォーム:aws
- AWSアクセスキーID: ※利用するAWSアカウントのAccess Keyを入力
- AWSシークレットキー: ※利用するAWSアカウントのSecret Keyを入力
- AWSリージョン:ap-northeast-1 (tokyo)
- Route53のベースドメイン名:example.com ※AWS Route53に登録したドメイン名
- クラスター名:nicptestcluster ※任意の名前
- Pull Secret:※”/os42/pull-secret.txt”の内容をコピー&ペースト
※特に完了のメッセージは表示されませんのでご注意ください。
<install-config.yaml ファイルを編集し、コンピュートレプリカ の数を 0 にします。>
#vi install-config.yaml
compute:
– hyperthreading: Enabled
name: worker
platform: {}
replicas: 3 ← ここを0に変更
<install-config.yaml ファイルはインストール実行時に消去されてしまうので、別名でバックアップしておきます。>
#cp install-config.yaml install-config.yaml.org
(3)インフラストラクチャー名の抽出
*インストールプログラムが生成する Ignition 設定ファイルには、24時間が経過すると期限切れになる証明書が含まれます。
<クラスターの Kubernetes マニフェストを生成します。>
#./openshift-install create manifests –dir=/os42
<openshiftフォルダが作成されるのでフォルダ内を確認します。>
# ll openshift
-rw-r—–. 1 root root 219 3月 18 09:49 99_cloud-creds-secret.yaml
-rw-r—–. 1 root root 181 3月 18 09:49 99_kubeadmin-password-secret.yaml
-rw-r—–. 1 root root 1530 3月 18 09:49 99_openshift-cluster-api_master-machines-0.yaml
-rw-r—–. 1 root root 1530 3月 18 09:49 99_openshift-cluster-api_master-machines-1.yaml
-rw-r—–. 1 root root 1530 3月 18 09:49 99_openshift-cluster-api_master-machines-2.yaml
-rw-r—–. 1 root root 2713 3月 18 09:49 99_openshift-cluster-api_master-user-data-secret.yaml
-rw-r—–. 1 root root 2027 3月 18 09:49 99_openshift-cluster-api_worker-machineset-0.yaml
-rw-r—–. 1 root root 2027 3月 18 09:49 99_openshift-cluster-api_worker-machineset-1.yaml
-rw-r—–. 1 root root 2027 3月 18 09:49 99_openshift-cluster-api_worker-machineset-2.yaml
-rw-r—–. 1 root root 2713 3月 18 09:49 99_openshift-cluster-api_worker-user-data-secret.yaml
-rw-r—–. 1 root root 1207 3月 18 09:49 99_openshift-machineconfig_master.yaml
-rw-r—–. 1 root root 1207 3月 18 09:49 99_openshift-machineconfig_worker.yaml
-rw-r—–. 1 root root 222 3月 18 09:49 99_role-cloud-creds-secret-reader.yaml
<クラスターがコントロールプレーンマシンを自動的に生成するのを防ぐために、コントロールプレーンマシンを定義する Kubernetes マニフェストファイルを削除します。>
#rm -f openshift/99_openshift-cluster-api_master-machines-*.yaml
<同様に、ワーカーマシンを定義する Kubernetes マニフェストファイルを削除します。>
#rm -f openshift/99_openshift-cluster-api_worker-machineset-*.yaml
</oc42/manifests/cluster-scheduler-02-config.yml を変更し、Pod がコントロールプレーンマシンにスケジュールされないようにします。>
# vi /oc42/manifests/cluster-scheduler-02-config.yml
“mastersSchedulable”パラメーターの値を False に設定、保存します。
<Ignition 設定ファイルを取得します。>
#./openshift-install create ignition-configs –dir=/os42
<コマンド実行後、作成されたファイル・ディレクトリを確認します。>
# ll
-rw-r–r–. 1 root root 706 3月 9 20:16 README.md
drwxr-x—. 2 root root 50 3月 18 09:52 auth ←あることを確認
-rw-r—–. 1 root root 291635 3月 18 09:53 bootstrap.ign ←あることを確認
drwxr-xr-x. 2 root root 4096 3月 18 09:39 conf
-rw-r—–. 1 root root 4045 3月 18 09:49 install-config.yaml.org
-rw-r—–. 1 root root 1837 3月 18 09:52 master.ign ←あることを確認
-rw-r—–. 1 root root 267 3月 18 09:53 metadata.json ←あることを確認
-rwxr-xr-x. 1 root root 323536416 3月 9 20:16 openshift-install
-rw-r–r–. 1 root root 80468756 3月 16 10:18 openshift-install-linux-4.2.23.tar.gz
-rw-r–r–. 1 root root 2763 3月 4 13:15 pull-secret.txt
-rw-r—–. 1 root root 1837 3月 18 09:52 worker.ign ←あることを確認
# ll auth/
-rw-r—–. 1 root root 23 3月 18 09:52 kubeadmin-password ←あることを確認
-rw-r—–. 1 root root 8972 3月 18 09:52 kubeconfig ←あることを確認
<インフラストラクチャー名を抽出します。>
Ignition 設定ファイルメタデータからインフラストラクチャー名を抽出・表示します。ここで事前に準備したjqコマンドが必要になるのですね。
# jq -r .infraID /os42/metadata.json
nicptestcluster-w8r8h ←インフラストラクチャー名が出力されることを確認
(4)AWS での VPC の作成
</os42/confディレクトリに以下のファイルを作成します。>
なお、これ以降の手順の中で作成した yamlファイル、jsonファイルともファイル名は任意です。
CloudFormation Template:”cf_newvpc.yaml”ファイル
CloudFormation Templateのパラメーター:”cf_newvpc.json”ファイル
*cf_newvpc.yaml、cf_newvpc.jsonファイルの中身はRed Hatマニュアルページの”1.5.7. AWS での VPC の作成”に書かれている内容をコピー・アンド・ペーストします。今回はマニュアル記載の値のままで作成しました。
| ParameterKey | ParameterValue | 備考 |
| VpcCidr | 10.0.0.0/16 | VPC の CIDR ブロック。 |
| AvailabilityZoneCount | 1 | VPC をデプロイするAZの数 |
| SubnetBits | 12 | 各AZ内の各サブネットのサイズ |
<VPC 作成の CloudFormation 展開コマンドを実行します。>
–stack-name の後のスタック名(以下のコマンドでは createvpc)は任意の名前です。
*ここで本検証で初めて CloudFormation を実行しました。
(5)AWS でのネットワークおよび負荷分散コンポーネントの作成
<VPC作成時と同様に、マニュアルの該当ページの内容を含んだファイルをそれぞれ”/os42/conf”に配置します。>
CloudFormation Template:”cf_network.yaml”ファイル
CloudFormation Templateのパラメーター:”cf_network.json”ファイル
<cf_network.jsonファイルを編集します。>
ここがポイントです。
以下の cf_network.jsonファイル内の7つの ParameterKey に指定する ParameterValue を、これまで実行したコマンドや情報からの値に更新します。
| ParameterKey | ParameterValue | 備考 |
| ClusterName | nicptestcluster | install-config.yaml ファイルを生成した時に入力したクラスター名 |
| InfrastructureName | nicptestcluster-w8r8h | Ignition 設定ファイルから抽出したインフラストラクチャー名 |
| HostedZoneId | ZMxxxxxxxxxxx | Route53 パブリックゾーン ID(事前にAWSコンソールで確認します) |
| HostedZoneName | example.com | nstall-config.yaml ファイルを生成した時に使用した Route53 ベースドメイン名 |
| PublicSubnets | subnet-0306b9ca39a3a00bd | VPC の CloudFormation テンプレートの出力より |
| PrivateSubnets | subnet-0407cf93524961fb4 | VPC の CloudFormation テンプレートの出力より |
| VpcId | vpc-00a56e4c475a50da8 | VPC の CloudFormation テンプレートの出力より |
<更新した cf_network.jsonファイルを用いて CloudFormation 展開コマンドを実行します。>
# aws cloudformation create-stack –stack-name createnetwork –template-body file:///os42/conf/cf_network.yaml –parameters file:///os42/conf/cf_network.json –capabilities CAPABILITY_NAMED_IAM
<出力を確認します。>
# aws cloudformation describe-stacks –stack-name createnetwork
| ParameterKey | ParameterValue | 備考 |
| PrivateHostedZoneId | Z0xxxxxxxxxxxxxxxxxxxx | プライベート DNS のホストゾーン ID |
| ExternalApiLoadBalancerName | net/nicptestcluster-w8r8h-ext/9a604677bb972af0 | 外部 API ロードバランサーのフルネーム |
| InternalApiLoadBalancerName | net/nicptestcluster-w8r8h-int/a277ca3a4501369a | 内部 API ロードバランサーのフルネーム |
| ApiServerDnsName | api-int.nicptestcluster. example.com | API サーバーのFQDN |
| RegisterNlbIpTargetsLambda | arn:aws:lambda:ap-northeast-1:359962000209:function:createnetwork-RegisterNlbIpTargets-1M2PEFJK0J2C3 | これらのロードバランサーの登録/登録解除に役立つ Lambda ARN |
| ExternalApiTargetGroupArn | arn:aws:elasticloadbalancing:ap-northeast-1:359962000209:targetgroup/creat-Exter-RH5R6UUT2ULX/80f9d95fe136b5e3 | 外部 API ターゲットグループの ARN |
| InternalApiTargetGroupArn | arn:aws:elasticloadbalancing:ap-northeast-1:359962000209:targetgroup/creat-Inter-B5IB5RST56XN/4cfdcc5ae595e3f9 | 内部 API ターゲットグループの ARN |
| InternalServiceTargetGroupArn | arn:aws:elasticloadbalancing:ap-northeast-1:359962000209:targetgroup/creat-Inter-NEZL8AMZ4W1X/5a6cce34822ca9dc | 内部サービスターゲットグループの ARN |
(6)AWS でのセキュリティーグループおよびロールの作成
<これまでと同様にマニュアルの該当ページの内容を含んだファイルをそれぞれ”/os42/conf”に配置します。>
CloudFormation Templateのパラメーター:”cf_security.json”ファイル
CloudFormation Template:”cf_security.yaml”ファイル
<cf_security.jsonファイルを編集します。>
以下の4箇所のParameterValueに値をセットします。
| ParameterKey | ParameterValue | 備考 |
| InfrastructureName | nicptestcluster-w8r8h | Ignition 設定ファイルから抽出したインフラストラクチャー名 |
| VpcCidr | 10.0.0.0/16 | VPCのサブネットアドレス値 |
| PrivateSubnets | subnet-0407cf93524961fb4 | VPC の CloudFormation テンプレートの出力より |
| VpcId | vpc-00a56e4c475a50da8 | VPC の CloudFormation テンプレートの出力より |
<CloudFormation展開コマンドを実行します。>
# aws cloudformation create-stack –stack-name createsecurity –template-body file:///os42/conf/cf_security.yaml –parameters file:///os42/conf/cf_security.json –capabilities CAPABILITY_NAMED_IAM
<出力を確認します。>
# aws cloudformation describe-stacks –stack-name createsecurity
| ParameterKey | ParameterValue | 備考 |
| MasterSecurityGroupId | sg-0ca008469442d0702 | マスターセキュリティーグループ ID |
| WorkerSecurityGroupId | sg-0fcaab02eeb63b716 | ワーカーセキュリティーグループ ID |
| MasterInstanceProfile | createsecurity-MasterInstanceProfile-JAFR521FJOOL | マスター IAM インスタンスプロファイル |
| WorkerInstanceProfile | createsecurity-WorkerInstanceProfile-1320LLA579623 | ワーカー IAM インスタンスプロファイル |
(7)AWS インフラストラクチャーの RHCOS AMI
<利用するRHCOS AMIのAWSゾーンとAWS AMIをマニュアルページの”1.5.10. AWS インフラストラクチャーの RHCOS AMI”にて確認します。>
今回は aws configure でも指定した ap-northeast-1 ですので、該当ゾーンの AWS AMI を確認します。
- AWSゾーン:ap-northeast-1
- AWS AMI:ami-0426ca3481a088c7b
3-2. OpenShift導入
(1)Bootstrapノード作成
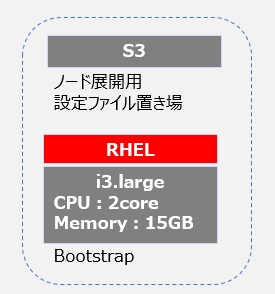
OpenShiftクラスターの初期化で使用するBootstrapノードをAWS上に作成します。
<Ignition 設定ファイルを S3バケットに配置します。>
まずS3バケットを作成します
# aws s3 mb s3://nicptestcluster-infra
続いてIgnition 設定ファイル(bootstrap.ign )をS3バケットにアップロードします。
# aws s3 cp bootstrap.ign s3://nicptestcluster-infra/bootstrap.ign
最後にファイルがアップロードされたことを確認します。
# aws s3 ls s3://nicptestcluster-infra/
2020-03-27 10:08:33 291635 bootstrap.ign
</os42/confディレクトリに以下のファイルを作成します。>
CloudFormation Template:”cf_bootstrap.yaml”ファイル
CloudFormation Templateのパラメーター:”cf_bootstrap.json”ファイル
<cf_bootstrap.jsonファイルを編集します。>
| ParameterKey | ParameterValue | 備考 |
| InfrastructureName | nicptestcluster-w8r8h | Ignition 設定ファイルから抽出したインフラストラクチャー名 |
| RhcosAmi | ami-0426ca3481a088c7b | 確認したAWS AMI |
| AllowedBootstrapSshCidr | 0.0.0.0/0 | デフォルトのまま |
| PublicSubnet | subnet-0306b9ca39a3a00bd | VPC の CloudFormation テンプレートの出力より |
| MasterSecurityGroupId | sg-0ca008469442d0702 | セキュリティーグループおよびロールの CloudFormation テンプレートの 出力より |
| VpcId | vpc-00a56e4c475a50da8 | VPC の CloudFormation テンプレートの出力より |
| BootstrapIgnitionLocation | s3://nicptestcluster-infra/bootstrap.ign | ブートストラップファイルの場所 |
| AutoRegisterELB | yes | ネットワークロードバランサー (NLB) を登録するかどうか |
| RegisterNlbIpTargetsLambdaArn | arn:aws:lambda:ap-northeast-1:359962000209:function:createnetwork-RegisterNlbIpTargets-1M2PEFJK0J2C3 | ネットワークのCloudFormationテンプレートの出力より |
| ExternalApiTargetGroupArn | arn:aws:elasticloadbalancing:ap-northeast-1:359962000209:targetgroup/creat-Exter-RH5R6UUT2ULX/80f9d95fe136b5e3 | ネットワークのCloudFormationテンプレートの出力より |
| InternalApiTargetGroupArn | arn:aws:elasticloadbalancing:ap-northeast-1:359962000209:targetgroup/creat-Inter-B5IB5RST56XN/4cfdcc5ae595e3f9 | ネットワークのCloudFormationテンプレートの出力より |
| InternalServiceTargetGroupArn | arn:aws:elasticloadbalancing:ap-northeast-1:359962000209:targetgroup/creat-Inter-NEZL8AMZ4W1X/5a6cce34822ca9dc | ネットワークのCloudFormationテンプレートの出力より |
<CloudFormation 展開コマンドを実行します。>
# aws cloudformation create-stack –stack-name bootstrap –template-body file:///os42/conf/cf_bootstrap.yaml –parameters file:///os42/conf/cf_bootstrap.json –capabilities CAPABILITY_NAMED_IAM
<出力を確認します。>
# aws cloudformation describe-stacks –stack-name bootstrap
| ParameterKey | ParameterValue | 備考 |
| BootstrapInstanceId | i-0a68a104e8a04ae08 | Bootstrapインスタンス ID |
| BootstrapPublicIp | 13.112.188.xxx | Bootstrapノードのパブリック IP アドレス |
| BootstrapPrivateIp | 10.0.0.xxx | Bootstrapのプライベート IP アドレス |
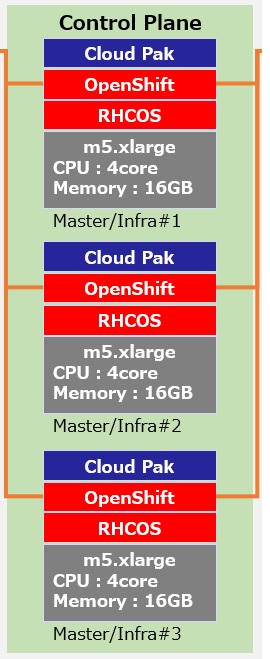
(2)コントロールプレーン(Masterノード)の作成
</os42/confディレクトリに以下のファイルを作成します。>
CloudFormation Template:”cf_controlplane.yaml”ファイル
CloudFormation Templateのパラメーター:”cf_controlplane.json”ファイル
<cf_controlplane.jsonファイルを編集します。>
| ParameterKey | ParameterValue | 備考 |
| InfrastructureName | nicptestcluster-w8r8h | Ignition 設定ファイルから抽出したインフラストラクチャー名 |
| RhcosAmi | ami-0426ca3481a088c7b | 確認したAWS AMI |
| AutoRegisterDNS | yes | yesまたはno |
| PrivateHostedZoneId | Z0xxxxxxxxxxxxxxxxxxxx | ネットワークのCloudFormationテンプレートの出力より |
| Master0Subnet | subnet-0407cf93524961fb4 | VPC の CloudFormation テンプレートの出力より |
| Master1Subnet | subnet-0407cf93524961fb4 | VPC の CloudFormation テンプレートの出力より |
| Master2Subnet | subnet-0407cf93524961fb4 | VPC の CloudFormation テンプレートの出力より |
| MasterSecurityGroupId | sg-0ca008469442d0702 | セキュリティーグループおよびロールの CloudFormation テンプレートより |
| IgnitionLocation | https://api-int.nicptestcluster.example.com:22623/ config/master |
生成される Ignition 設定ファイルの場所を指定 |
| CertificateAuthorities | data:text/plain;charset=utf-8;base64,LS0tLS1・・・ | インストールディレクトリーにあるmasiter.ignファイルから値を指定 |
| MasterInstanceProfileName” | createsecurity-MasterInstanceProfile-JAFR521FJOOL | セキュリティーグループおよびロールの CloudFormation テンプレートより |
| MasterInstanceType | m5.xlarge | 利用するEC2インスタンスタイプを指定 |
| AutoRegisterELB | yes | yesまたはno |
| RegisterNlbIpTargetsLambdaArn | arn:aws:lambda:ap-northeast-1:359962000209:function:createnetwork-RegisterNlbIpTargets-1M2PEFJK0J2C3 | ネットワークのCloudFormationテンプレートの出力より |
| ExternalApiTargetGroupArn | arn:aws:elasticloadbalancing:ap-northeast-1:359962000209:targetgroup/creat-Exter-RH5R6UUT2ULX/80f9d95fe136b5e3 | ネットワークのCloudFormationテンプレートの出力より |
| InternalApiTargetGroupArn | arn:aws:elasticloadbalancing:ap-northeast-1:359962000209:targetgroup/creat-Inter-B5IB5RST56XN/4cfdcc5ae595e3f9 | ネットワークのCloudFormationテンプレートの出力より |
| InternalServiceTargetGroupArn | arn:aws:elasticloadbalancing:ap-northeast-1:359962000209:targetgroup/creat-Inter-NEZL8AMZ4W1X/5a6cce34822ca9dc | ネットワークのCloudFormationテンプレートの出力より |
<今回、”MasterInstanceType” に m5 インスタンスタイプを指定するので、そのインスタンスタイプを cf_controlplane.yaml ファイルの MasterInstanceType.AllowedValues パラメーターに追加します。>
途中、省略
MasterInstanceType:
Default: m4.xlarge
Type: String
AllowedValues:
– “m4.xlarge”
– “m4.2xlarge”
– “m4.4xlarge”
– “m4.8xlarge”
– “m4.10xlarge”
– “m4.16xlarge”
– “m5.xlarge” ←追加
– “m5.2xlarge” ←追加
– “m5.4xlarge” ←追加
– “m5.8xlarge” ←追加
以下、省略
<CloudFormation 展開コマンドを実行します。>
# aws cloudformation create-stack –stack-name controlplane –template-body file:///os42/conf/cf_controlplane.yaml –parameters file:///os42/conf/cf_controlplane.json
<状況を確認します。>
# aws cloudformation describe-stacks –stack-name controlplane
(3)Workerノードの作成
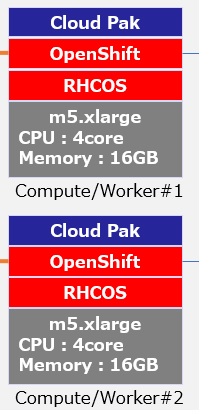
※CloudFormation テンプレートは、1 つのWorkerマシンを表すスタックを作成します。今回はWorkerノードを2台作成するので、それぞれのWorkerマシンにスタックを作成する必要があります。
</os42/confディレクトリに以下のファイルを作成します。>
CloudFormation Template:”cf_worker.yaml”ファイル
CloudFormation Templateのパラメーター:”cf_worker.json”ファイル
<cf_worker.jsonファイルを編集します。>
| ParameterKey | ParameterValue | 備考 |
| InfrastructureName | nicptestcluster-w8r8h | Ignition 設定ファイルから抽出したインフラストラクチャー名 |
| RhcosAmi | ami-0426ca3481a088c7b | 確認したAWS AMI |
| Subnet | subnet-0407cf93524961fb4 | VPC の CloudFormation テンプレートの出力より |
| WorkerSecurityGroupId | sg-0fcaab02eeb63b716 | セキュリティーグループおよびロールの CloudFormation テンプレートより |
| IgnitionLocation | https://api-int.nicptestcluster.example.com:22623/ config/worker |
生成される Ignition 設定ファイルの場所を指定 |
| CertificateAuthorities | data:text/plain;charset=utf-8;base64,LS0tLS1・・・ | インストールディレクトリーにあるworker.ignファイルから値を指定 |
| WorkerInstanceProfileName | createsecurity-WorkerInstanceProfile-1320LLA579623 | セキュリティーグループおよびロールの CloudFormation テンプレートより |
| WorkerInstanceType | m5.xlarge | 利用するEC2インスタンスタイプを指定 |
<cf_controlplane.yamlと同様に、”MasterInstanceType” に m5 インスタンスタイプを指定するので、そのインスタンスタイプを cf_worker.yaml ファイルの MasterInstanceType.AllowedValues パラメーターに追加します。>
CloudFormation 展開コマンドを実行。
今回ワーカーノードは2台作成するので、stack-name を「worker1」「worker2 」と分けて2回実行します。
# aws cloudformation create-stack –stack-name worker1 –template-body file:///os42/conf/cf_worker.yaml –parameters file:///os42/conf/cf_worker.json
# aws cloudformation create-stack –stack-name worker2 –template-body file:///os42/conf/cf_worker.yaml –parameters file:///os42/conf/cf_worker.json
<出力を確認します。>
# aws cloudformation describe-stacks –stack-name worker1
# aws cloudformation describe-stacks –stack-name worker2
(4)Bootstrapノードの初期化
<Bootstrapノードの初期化コマンドを実行し、FATAL エラーなどが出ずに終了することを確認します。>
# ./openshift-install wait-for bootstrap-complete –dir=/os442 –log-level=info
INFO Waiting up to 30m0s for the Kubernetes API at https://api.test.example.com:6443…
INFO API v1.14.6-152-g117ba1f up
INFO Waiting up to 30m0s for bootstrapping to complete…
INFO It is now safe to remove the bootstrap resources
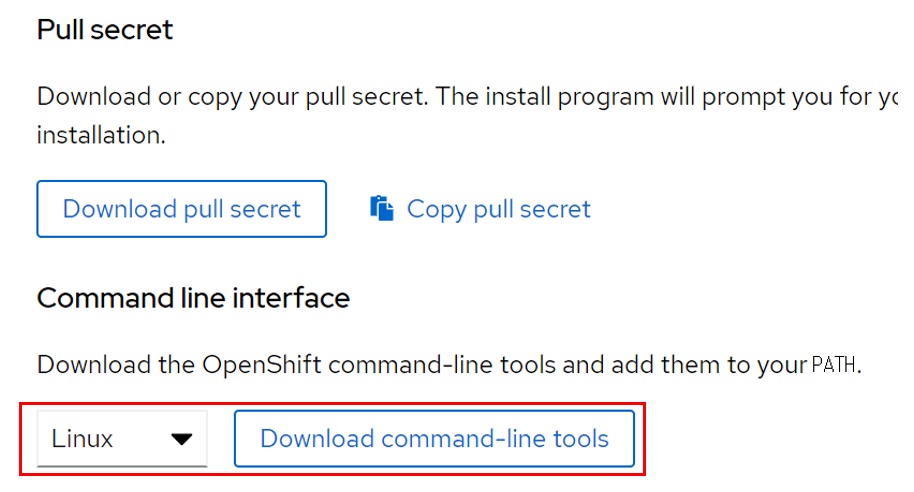
(5)CLI のインストール
<OpenShift Installer、Pull secretをダウンロードしたページにて、「Command-line interface」項目からOSとして「Linux」を選択し、「command-line tools」をダウンロードします。>
<CLIツールの展開 – ダウンロードした圧縮ファイルを展開します 。>
※OS42ディレクトリにダウンロードしたファイルをコピーし、展開します。
# cp tar xvf openshift-client-linux-4.2.23.tar.gz /os42/tar xvf openshift-client-linux-4.2.23.tar.gz
# tar xvf openshift-client-linux-4.2.23.tar.gz
※パスに/oc42を追加します。
# export PATH=”$PATH:/os42″
※ocコマンドのテスト
# oc help
(6)クラスターへのログイン
※kubeadmin 認証情報をエクスポートします。
# export KUBECONFIG=/os42/auth/kubeconfig
※oc コマンドを正常に実行できることを確認
# oc whoami
system:admin
(7)マシンの CSR の承認
<クラスターがマシンを認識していること(今回Masterノード3台、Workerノード2台が表示されること)を確認します。>
# oc get nodes
NAME STATUS ROLES AGE VERSION
ip-10-0-48-xxx.ap-northeast-1.compute.internal Ready worker 57s v1.14.6+8fc50dea9
ip-10-0-49-xxx.ap-northeast-1.compute.internal Ready worker 42m v1.14.6+8fc50dea9
ip-10-0-50-xxx.ap-northeast-1.compute.internal Ready master 22h v1.14.6+8fc50dea9
ip-10-0-58-xxx.ap-northeast-1.compute.internal Ready master 22h v1.14.6+8fc50dea9
ip-10-0-59-xxx.ap-northeast-1.compute.internal Ready master 22h v1.14.6+8fc50dea9
(8)Operator の初期設定
5秒ごとに実行される oc get clusteroperators の結果をモニタリングし、クラスターコンポーネントがオンラインになることを確認します。
<”Available” が ”True”、”DEGRADED” 列が ”False” になることを確認します。>
# watch -n5 oc get clusteroperators
NAME VERSION AVAILABLE PROGRESSING DEGRADED SINCE
authentication 4.2.23 True False False 44m
cloud-credential 4.2.23 True False False 22h
cluster-autoscaler 4.2.23 True False False 22h
console 4.2.23 True False False 46m
dns 4.2.23 True False False 22h
image-registry 4.2.23 True False False 50m
ingress 4.2.23 True False False 50m
・
・
以下、省略
本検証では、(7)マシンの CSR の承認の手順で全ノードが Ready となった後に確認するとすべての Operator コンポーネントがオンライン(AVAILABLE 列が True)になっていましたが、image-registry Operator がオフライン(AVAILABLE 列が False)である場合はマニュアルページの「1.5.17.1. イメージレジストリーストレージの設定」の章をご確認ください。
(9)Bootstrapノードの削除
クラスターの初期 Operator 設定を完了した後に Bootstrapリソースを削除します。
<CloudFormation コマンドで”(1)Bootstrapノード作成”手順で作ったbootstrap という名前の Stack を削除します。>
これにより、ブートストラップノードが削除されます。
# aws cloudformation delete-stack –stack-name bootstrap
(10)クラスターのインストールを完了
<クラスターのインストール完了を確認します。>
以下のコマンドでインストール状況をモニターします。
#./openshift-install –dir=/os42 wait-for install-complete
(中略)
INFO Install complete!
INFO To access the cluster as the system:admin user when using ‘oc’, run ‘export KUBECONFIG=/os42/auth/kubeconfig’
INFO Access the OpenShift web-console here: https://console-openshift-console.apps.nicptestcluster.example.com
INFO Login to the console with user: kubeadmin, password: XXXXX
上記のように ”Install complete!” となり、「コンソールのURL」「ユーザー名」「パスワード」が表示されればインストール完了で OpenShift 環境が利用可能となります。
!!重要!!
インストールプログラムが生成する Ignition 設定ファイルには、24 時間が経過すると期限切れになる証明書が含まれます。
Ignition ファイルは 24 時間有効であるため、この時間内に OpenShift デプロイメントを実行する必要があります。 作成から24時間過ぎた場合はIgnition ファイルを再生成する必要があります。
<動作確認 – OpenShiftのコンソールにアクセスします。>
- Webコンソールの場合:
https://console-openshift-console.apps.nicptestcluster.example.com - CLI の場合:
oc login -u kubeadmin -p XXXXX https://api.nicptestcluster.example.com:6443
以上で OpenShift インストールは完了となります。
お問い合わせ
この記事に関するご質問は下記までご連絡ください。
エヌアイシー・パートナーズ株式会社
技術支援本部
E-Mail:nicp_support@NIandC.co.jp